How to download and install Windows Movie Maker
1.Go downloads to the web http://www.microsoft.com , and find the Windows Movie Maker 2.0 is installed on the Windows XP operating system file size approximately 12 MB.
2. Double-click the downloaded file to install. And the steps the Wizard.
Function of the program
You can use your picture with the machine was used in the making movies and decorated with your favorite music or wording sentence to the movie is good to complete.
You can use Windows Movie Maker to capture audio and video to your computer from a video camera, Web camera, or other video source, and then use the captured content in your movies. You can also import existing audio, video, or still pictures into Windows Movie Maker to use in the movies you create. After editing the audio and video content in Windows Movie Maker, which can include adding titles, video transitions, or effects, you can then save your final movie and share it with friends and family.
You can save the movies you create to your computer or to a recordable CD-R or rewriteable CD-RW CD ,depending on your CD recorder. You may also choose to share it with others by sending the movie as an attachment in an e-mail message or by sending it to the Web. If you have a digital video camera connected to your computer, you can also choose to record the movie to a tape in your camera and then play it back on the camera or on a TV.
When you import a video, audio, or picture file, the file remains in the original location from which it was imported. The resulting clip that appears in Windows Movie Maker is a representation of the original source file; it is not a copy of the source file. In other words, if you edit the source file in another program after it is already imported into Windows Movie Maker, the changes that you make to the file automatically appear in Windows Movie Maker and in any Windows Movie Maker projects that include the edited clip. And, if you delete the thumbnail or clip for the file in Windows Movie Maker, the source file still remains unchanged in the original location. To ensure that you can continue to work with a project, avoid renaming, deleting, or moving the original source files.
You can import files with the following file name extensions into Windows Movie Maker to use in your project:
- Audio files: .aif, .aifc, .aiff .asf, .au, .mp2, .mp3, .mpa, .snd, .wav, and .wma
- Picture files: .bmp, .dib, .emf, .gif, .jfif, .jpe, .jpeg, .jpg, .png, .tif, .tiff, and .wmf
- Video files: .asf, .avi, .m1v, .mp2, .mp2v, .mpe, .mpeg, .mpg, .mpv2, .wm, and .wmv
How to run Windows Movie Maker
Run from the Start -> All Programs -> Windows Movie Maker
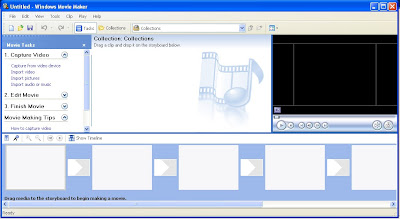
 1. Title bar, Menu bar, Toolbar and the Toolbar will be collected Collections tasks, we can choose.
2. Is showing the steps to use include
3. Capture Video is a video recorder. Import File or Video, Pictures, Audio / Music one.
4. Edit Video edit or add to the effects of video Allianz imported.
5. Finish Movie is stored and the output file.
6. Movie Making Tips tool is shown. For users.
Getting started on Windows Movie Maker
1. We can click Record to record video or camera equipment Encoder.
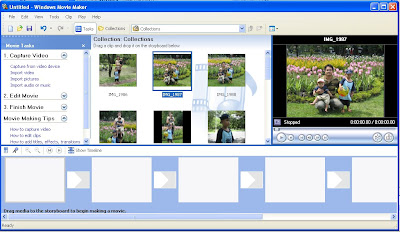
Or use the File Import also supports both Picture (slides) Video (animation) and Audio Sound.
2. We can create a folder on a second clip from the Toolbar to save work. And work to keep the clip in three areas.
3. Verify from four areas Monitor and click Play to run the job.
4. The second drag came from the area in five areas.
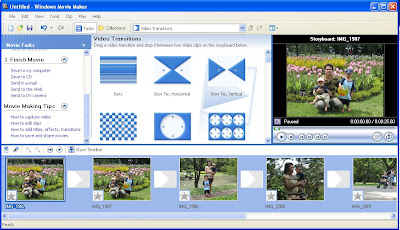
5. When we arrange work as desired. I click the menu File> Save Move File.

Edit video on Windows Movie Maker
1. When we have to put the video on the Story Board and if you want to cut, change the video mode by clicking on a Time Line Timeline.
2. We are able to zoom if the video is large. Or too small.
3. Click the time to cut
4. Click the menu Clip> Set start trim point for the entire left side cut video.
Click Menu Clip> Set End trim point for cutting videos on the right all
Or Clip> Clear trim point, if you want to cancel.
Connecting video on Windows Movie Maker
1. When we bring video into Windows Movie Maker is a separate clip small we are able to put together by Select Clips (Press keys Control + A Select All) and then be left in the Story Board or Time. line.
2. Click the menu Clip> Combine.
Separate video on Windows Movie Maker
1. To put the video timeline (to be in this mode only).
2. Click the menu when they want, and click Clip> Split to separate work
How to put into Video Effects and Video Transitions
1. Video Effects to determine the texture of the video files. We choose the Movie Tasks> Edit Movie> View video effects> choose format to local Video Effects> drag the video you want.
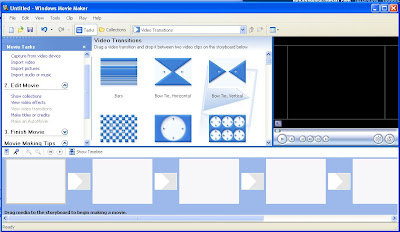
2. Video transitions to the format change between clips. This will be dragged into the two clips in our Story Board mode, determined by the Movie Tasks> Edit Movie> View video transitions> emissions in the process of Story board.

How to Make titles or credits on Windows Movie Maker
1. click the desired format.
2. Title at the beginning of the first video input prefix set this
3. Title before the selected clip add prefix is only in this video series.
4. Title on the selected clip is put title in the selected clip.
5. Title after the selected clip is put back clip this title.
6. Credits at the end the text after this video series.
 7. The list when you click Add in Section 5, enter the text you want.
8. Click the Done when finished.
9. Insert effects on various Linux, then we can click Save to my computer the process step and the files stored.
10. That we can see the results before this collection and from Windows Movie Maker.
Finished to made your videos.
ไม่มีความคิดเห็น:
แสดงความคิดเห็น